If you are specifically looking for multiline regular expressions, look at this post.
You may already know that I am a big fan of Notepad++. Apparently, a lot of other people are interested in Notepad++ too. My introductory post on Notepad++ is the most popular post on my speechblog. I have a feeling that that is about to change.
Since the release of version 4.9, the Notepad++ Find and Replace commands have been updated. There is now a new Extended search mode that allows you to search for tabs(\t), newline(\r\n), and a character by its value (\o, \x, \b, \d, \t, \n, \r and \\). Unfortunately, the Notepad++ documentation is lacking in its description of these new capabilities. I found Anjesh Tuladhar's excellent slides on regular expressions in Notepad++ useful. After six hours of trial and error, I managed to bend Notepad++ to my will. And so I decided to post what I think is the most detailed step-by-step guide to Search and Replace in Notepad++, and certainly the most detailed guide to cleaning up DMDX .zil output files on the internet.
What's so good about Extended search mode?
One of the major disadvantages of using regular expressions in Notepad++ was that it did not handle the newline character well—especially in Replace. Now, we can use Extended search mode to make up for this shortcoming. Together, Extended and Regular Expression search modes give you the power to search, replace and reorder your text in ways that were not previously possible in Notepad++.
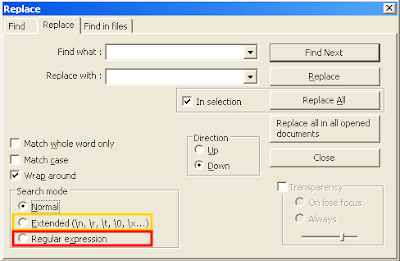
Search modes in the Find/Replace interface
In the Find (Ctrl+F) and Replace (Ctrl+H) dialogs, the three available search modes are specified in the bottom right corner. To use a search mode, click on the radio button before clicking the Find Next or Replace buttons.

Cleaning up a DMDX .zil file
DMDX allows you to run experiments where the user responds by using the mouse or some other input device. Depending on the number of choices/responses (and of course the kind of task), DMDX will output a .zil file containing the results (instead of the traditional .azk file). This is specified in the header along with the various response options available to the participant. For some reason, DMDX outputs the reaction time twice—and on separate lines—in .zil files. Here's a guide for cleaning up these messy .zil files with Notepad++. Explanations of the Notepad++ search terms are provided in bullet points at the end of each step.
Step 1: Backup your original result file (e.g. yourexperiment.zil) and create a copy of that file (yourexperiment_copy.zil) that we will edit and clean up.
Step 2: Open yourexperiment_copy.zil in Notepad++ (version 4.9 or later).
Step 3: Remove all error messages.All lines containing DMDX error messages begin with an exclamation mark. Let's get rid of them.
Bring up the Replace dialog box (Ctrl+H) and select the Regular Expression search mode.
Find what: [!].*
Replace with: (leave this blank)
Press Replace All. All the error messages are gone.
- [!] finds the exclamation character.
- .* selects the rest of the line.
Step 4: Get rid of all these blank lines.
Switch to Extended search mode in the Replace dialog.
Find what: \r\n\r\n
Replace with: (leave this blank)
Press Replace All. All the blank lines are gone.
- \r\n is a newline character (in Windows).
- \r\n\r\n finds two newline characters (what you get from pressing Enter twice).
Step 5: Put each Item (DMDXspeak for trial) on a new line.
Switch to Regular Expression search mode.
Find what: (\+.*)(Item)
Replace with: \1\r\n\2
Press Replace All. "Item"s have been placed on new lines.
- \+ finds the + character.
- .* selects the text after the + up until the word "Item".
- Item finds the string "Item".
- () allow us to access whatever is inside the parentheses. The first set of parentheses may be accessed with \1 and the second set with \2.
- \1\r\n\2 will take + and whatever text comes after it, will then add a new line, and place the string "Item" on the new line.
So far so good. Our aim now is to delete duplicate or redundant information (reaction time data).
Step 6: Remove all newline characters using Extended search mode, replacing them with a unique string of text that we will use as a signpost for redundant data later in RegEx. Choose a string of text that does not appear in you .zil file—I have chosen mork.
Switch to Extended search mode in the Replace dialog.
Find what: \r\n
Replace with: mork
Press Replace All. All the newline characters are gone. Your entire DMDX .zil file is now one very long line of (in my case word-wrapped) text.
Step 7: We're nearly there. Using our mork signpost keyword, let's separate the different RT values.
Stay in Extended search mode.
Find what: ,
Replace with: ,mork
Press Replace All. Now, mork appears after every comma.
Step 8: Let's put the remaining Items on new lines.
Switch to and stay in Regular Expression search mode for the remaining steps.
Find what: mork(Item)
Replace with: \r\n\1
Press Replace All. All "Item"s should now be on new lines.
Step 9: Let's get rid of those duplicate RTs.
Find what: mork ([^A-Za-z]*)mork [^A-Za-z]*\,mork
Replace with: \1,
Press Replace All. Duplicate reaction times are gone. It's starting to look like a result file :)
- A-Z finds all letters of the alphabet in upper case.
- a-z finds all lower case letters.
- A-Za-z will find all alphabetic characters.
- [^...] is the inverse. So, if we put these three together: [^A-Za-z] finds any character except an alphabetic character.
- Notice that only one of the [^A-Za-z] is in parentheses (). This is recalled by \1 in the Replace with field. The characters outside of the parentheses are discarded.
Find what: mork
Replace with: (leave blank)
Press Replace All. The morks are gone.
Step 11: Separate each participant's data from the next.
Find what: (\**\*)
Replace with: \r\n\r\n\1\r\n\r\n
Press Replace All. The final product is a beautiful, comma-delimited .zil result file that is ready to be imported into Excel for further analysis.
Notepad++, is there anything it can't do?
Please post your questions in the comments below, rather than emailing me. This way, others can refer to my answers here, saving me many hours of responding to similar emails over and over.
Update 20/2/2009: Having trouble understanding regexp? I have created a new Guide for regular expressions. Check it out.


