21 June 2018
Australasian International Conference on Speech Science and Technology (SST) referencing style for Zotero
The Australasian International Conference on Speech Science and Technology (SST) is the biennial conference of the Australasian Speech Science and Technology Association (ASSTA). The conference accepts submissions for 1-page abstracts and 4-page papers, the latter of which are published in the conference proceedings.
SST papers use a modified IEEE referencing style.
I have modified the IEEE referencing style in the Zotero Styles Repository to create a custom SST reference style to take the pain out of preparing SST paper submissions.
Download SST reference style for Zotero
25 January 2017
Zotero minimalist referencing style for grant applications
- In-text citations are denoted by superscript numerals
- Reference list has single line spacing
- No journal article titles
- Journal names are abbreviated
- No journal issue numbers
- ≥ 3 author names are listed as "et al."
After each reference, I have inserted two forward slashes to demarcate separate references. I have also bolded the numeral that precedes each reference.
Once the reference list has been created, you may delete the carriage returns so that each reference does not take a new line.
My grant writing Zotero referencing style can be downloaded here.
30 October 2013
How to disable Protected View and Enable Editing button in Office 2010
Click File | Options | Trust Center | Trust Center Settings... | Protected View, which will bring you to this
![]() |
| click for larger view |
Uncheck Enable Protected View for files originating from the Internet, and then click OK.
You will have to do this in Word, then again in Excel etc. to get it to work in each Office app.
18 June 2009
Import high quality, high resolution images and figures (charts) into Word
So what's the problem? Well, by default, Word downsamples (compresses) images that you paste into your documents. It does this to keep the filesize of your .doc file as small as possible. This is because once upon a time people used 1.44 MB floppy disks to transport their files. Amazingly, there are still people alive that want to compress their images in Word (more than the default).
Thankfully, there is way to insert beautiful, crisp images into Word. Click on the Tools menu, and select Options. Once the Options box appears, click the General tab and then the Web options button. In the Web options box, click the Pictures tab. Change the Pixels per inch value from the default (72) to 300 (or whatever your requirements are).
A word of warning: After having set this value, do not assume that it will stay there. This value resets to 72 dpi unpredictably and without warning. My advice is to check this setting before inserting an imporant image or figure. Don't worry about it changing without you knowing. If it reverts to 72 dpi, when you insert an image it will look awful, which should make alarm bells ring.
30 January 2009
Figures and captions in Word
Step 1: Insert the image
Before inserting your image, reveal all formatting characters (shortcut: Ctrl+Shift+8). Press Enter at the part of the page where you want to insert your figure, this creates a carriage return character, and then select Insert | Picture | From file. Select the picture and then click Format | Picture, and click on the Size tab to resize the picture as needed.
Step 2: Create the caption
Click on the picture once then select Insert | Reference | Caption. Name the figure and click OK.
Step 3: Group them
Select both the caption and picture, then right click and select Grouping | Group. Now right click on the newly grouped object and select Format | Object. Click the Layout tab, then the Advanced button, then the Text Wrapping tab and select Top and Bottom, click OK.
Step 4: Select and lock the anchor
Now click on and move the anchor to the carriage return you created earlier.Get back into Format Object | Layout | Advanced, and click Lock anchor and set Horizontal Allignment to Centered relative to margin, Vertical Absolute position set to 0 below paragraph, tick Move object with text and Layout in table cell. Click OK.
Step 5: Format the caption
Click on the caption and format the text according to your figure caption styles. For APA, you will need two: one for the Figure x. part (in italics) and another for the title of the figure (not in italics).
Now you can make edits, add or remove paragraphs and your figures and captions will not disappear when you break over a page. Easy, no?
14 August 2008
Fix uneven line spacing when using Doulos SIL for transcription
Doulos SIL includes characters with diacritics that require a looser line spacing than fonts such as Times New Roman. If the line spacing was like that in Times New Roman, many characters would be clipped.
However, there is a solution! The SIL fonts FAQ provides the answer.
By adjusting the line spacing in the word processor, such as Microsoft Word 2003, it is possible to assign the same line spacing value to all lines of text within a given style. In Word, select Format|Paragraph and set the line spacing to use the Exactly setting and specify a value more suited to your needs.
12 August 2008
Creating a thesis in Word: Formatting text
Using Styles and Formatting
A style is collection of numerous formatting options that are grouped together, given a name, and that may be applied to selections of text throughout your document. When we create a document, the formatting we use indicates different levels within our document. For example, headings may be size 14, bold, underlined and centred; subheadings may be size 12, bold and left aligned; and, body text may be size 12 and justified.
The Styles and Formatting pane is accessed by pressing this button
on your toolbar or from the Format menu (keyboard shortcut: Alt+O+S). In addition to the default styles, you can create your own styles. Here is a screenshot of what my Subheading style might look like:
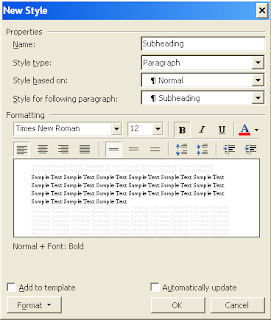
Notice that I have selected size 12, bold and left alignment. More detailed formatting options can be specified by clicking the Format button in the bottom left corner (it's a shortcut to the Format menu including Font, Paragraph, Bullets and Numbering etc.). Clicking the Add to template checkbox will ensure that this style will appear in all new Word documents in the future (an easy to way to ensure consistency in the formatting of your documents).Applying styles to text
The Styles and Formatting pane contains the existing styles available for your document. To apply a style, simply select the text in the document and click on the style in the task pane. The selected text on your document will change to reflect the formatting options of that style. You may repeatedly change the style applied to a selection of text by clicking on different style names. You can also make changes to a style after it has been applied to sections of text, and all of the sections of your document that have that style will update automatically. This allows you to change the formatting of large sections of your document quickly. For example, if I change the Subheading style above by clicking on the italicised text button, then all of text that I have applied the Subheading style to (presumably all of my subheadings) will automatically become italicised.
Never press Enter Enter to put a blank line between two paragraphs
We are all guilty of this. It might be ok to press the Enter key twice if you are just creating a page that you want to quickly print out, however, this is not the way that you should separate paragraphs in your serious documents - especially your thesis. At the end of each paragraph, you should press the Enter key only once. To create a space between one paragraph and the next click on Paragraph in the Format menu. Increase the value of Spacing After so that it is greater than 0 point.
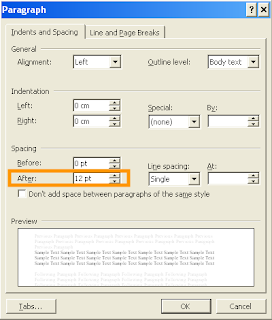
In this case, there will be a 12 point space after my paragraph - when I press the Enter key. Of course, you can specify this as part of any style. Had I specified this for my Subheading style above, this would mean that all pieces of text that I apply the Subheading style to would also be followed by a 12 point space.Stop getting frustrated at the one line of text that won't fit on the page
Word 2003 allows you to prevent individual lines from creeping over the page. In the Paragraph dialog (shown above), click on the Line and Page Breaks tab. Enabling Window/Orphan control prevents Word from printing the last line of a paragraph by itself at the top of a page (called window), or the first line of a paragraph by itself at the bottom of a page (called orphan).
Word also allows you to keep two paragraphs together on the same page. Use Keep With Next to keep one paragraph on the same page as the next paragraph.
15 September 2007
Set up your laptop for work: Make Word useable
Turn off Word annoyances
Don't you hate it when you try to select only one or two letters, but Word 'helps' you by selecting the whole word? How about auto-correcting words such as customise, summarise, colour? How about when a quotation mark 'helps' you by turning the wrong way? How about having to click on those two little arrows at the bottom of the menu so that you can 'unhide' the command that you want because Word 'helped' you by hiding infrequent commands? There is a long list of Word annoyances. Lets begin by turning off those annoying things that Word does automatically.
1. First things first - lets set the language to Australian English. From the Tools menu, select Language and then Set Language... and choose English (Australia). No more -ize endings.
2. Select Options... from the Tools menu. Click on the Edit tab. Untick When selecting, automatically select entire word. Now you can select only one character of a word.
3. From the Tools menu, select Autocorrect Options... and click on the Autocorrect tab. Untick Capitalize first letter of sentences and Capitalize first letter of table cells.
4. While in Autocorrect Options... click on the AutoFormat as you type tab and untick Straight quotes with smart quotes.
5. From the Tools menu, select Customize... and click on the Options tab. Select Always show full menus and Show shortcut keys in ScreenTips.
Customise your toolbars
The default Word 2003 toolbar layout isn't terrible, however, it can use a little research-student-tweaking. Luckily, you can add, remove, or edit toolbar buttons.
To customise a toolbar, select Customize... from the Tools menu and click on the Commands tab. From here you may add any command to any of your toolbars by simply dragging it into the desired position on your toolbar. To remove a command from your existing toolbars, simply drag it off the toolbar and drop it onto the Customize... dialog box.
Here is what the default Word 2003 toolbars look like (click toolbar to enlarge):
Ok, lets get started. I always remove these buttons:
Print - we will replace this with a more useful print button.
Email - who emails from Word?
Research - what is this?
Tables and borders - if you need to insert or modify a table, just use the Table menu.
Insert Table - as above.
Insert Excel Worksheet - if you need to insert or modify an Excel worksheet, just use the Insert menu.
Drawing - you will never use this.
Help - there's a search box in the top right corner.
Read - you will never use this.
Outside border - accessible via right click if you ever need it.
Now that we've gotten rid of the useless buttons, lets add some buttons that will make our lives easier and save us time in the future. Remember that toolbar buttons are added by selecting Customize... from the Tools menu and clicking on the Commands tab.
Save As - (from the File category) allows the user to save the document under a new name. This is very useful for saving different versions of your important documents.
Print... - (from the File category) when clicked, it will bring up the Print dialog box, allowing you to specify the number of copies, zoom, staple, double sided printing, two pages on each etc.
Paste Special - (from the Edit menu) allows you to remove formatting from text that has been copied to the clipboard.
Find - (from the Edit menu) allows you to search for (and replace) text in your document.
Header and Footer - (from the View menu) place text at the top or bottom of a page.
Symbol - (from the Insert menu) insert special, foreign, phonetics characters.
Superscript - (from the Format menu) useful for transcription e.g. the superscript h that indicates long lag VOT.
Of course, you might have some buttons that are useful to you that I haven't listed here. You should add them to your toolbar. Let us know which button you added in the Comments at the end of this post.
In the Customize... dialog box click on the Toolbars tab. Check the box next to Word Count. This will make the word count toolbar appear. This toolbar displays the number of words right in your toolbar.
After the above modifications, here's what my toolbars look like:


