Using Styles and Formatting
A style is collection of numerous formatting options that are grouped together, given a name, and that may be applied to selections of text throughout your document. When we create a document, the formatting we use indicates different levels within our document. For example, headings may be size 14, bold, underlined and centred; subheadings may be size 12, bold and left aligned; and, body text may be size 12 and justified.
The Styles and Formatting pane is accessed by pressing this button
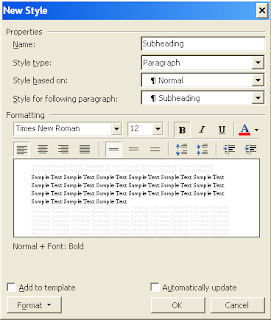
 on your toolbar or from the Format menu (keyboard shortcut: Alt+O+S). In addition to the default styles, you can create your own styles. Here is a screenshot of what my Subheading style might look like:
 Notice that I have selected size 12, bold and left alignment. More detailed formatting options can be specified by clicking the Format button in the bottom left corner (it's a shortcut to the Format menu including Font, Paragraph, Bullets and Numbering etc.). Clicking the Add to template checkbox will ensure that this style will appear in all new Word documents in the future (an easy to way to ensure consistency in the formatting of your documents).
Applying styles to text
The Styles and Formatting pane contains the existing styles available for your document. To apply a style, simply select the text in the document and click on the style in the task pane. The selected text on your document will change to reflect the formatting options of that style. You may repeatedly change the style applied to a selection of text by clicking on different style names. You can also make changes to a style after it has been applied to sections of text, and all of the sections of your document that have that style will update automatically. This allows you to change the formatting of large sections of your document quickly. For example, if I change the Subheading style above by clicking on the italicised text button, then all of text that I have applied the Subheading style to (presumably all of my subheadings) will automatically become italicised.
Never press Enter Enter to put a blank line between two paragraphs
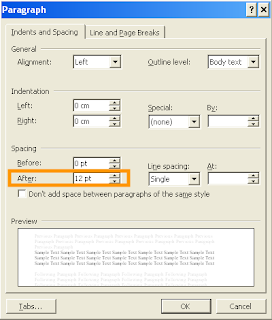
We are all guilty of this. It might be ok to press the Enter key twice if you are just creating a page that you want to quickly print out, however, this is not the way that you should separate paragraphs in your serious documents - especially your thesis. At the end of each paragraph, you should press the Enter key only once. To create a space between one paragraph and the next click on Paragraph in the Format menu. Increase the value of Spacing After so that it is greater than 0 point.
 In this case, there will be a 12 point space after my paragraph - when I press the Enter key. Of course, you can specify this as part of any style. Had I specified this for my Subheading style above, this would mean that all pieces of text that I apply the Subheading style to would also be followed by a 12 point space.
Stop getting frustrated at the one line of text that won't fit on the page
Word 2003 allows you to prevent individual lines from creeping over the page. In the Paragraph dialog (shown above), click on the Line and Page Breaks tab. Enabling Window/Orphan control prevents Word from printing the last line of a paragraph by itself at the top of a page (called window), or the first line of a paragraph by itself at the bottom of a page (called orphan).
Word also allows you to keep two paragraphs together on the same page. Use Keep With Next to keep one paragraph on the same page as the next paragraph.

No comments:
Post a Comment