Showing posts with label thesis. Show all posts

07 September 2009

Zotero: Book titles are capitalised in my APA reference list when they shouldn't be! Fix it

As I've mentioned before, I am a big fan of Zotero. It is one of those pieces of software that you love more and more the more you use it. I've already shown you how to remove the issue number from appearing in your APA reference list. In this post, we're going to tackle incorrect capitalisation in book titles. The APA Publication Manual specifies that book titles should be sentence case and in italics.

Most of the time, Zotero handles this without a hitch. But sometimes, the title of a book Appears In Capitals, which is not consistent with APA formatting. Why does this occur? Well, there are a few potential reasons, and rather than going through them all, I will instead share with you my foolproof method for making sure that book titles display the way that they should. Always.

Let's start at the beginning
First things first. When importing a reference into Zotero, format it so that the capitalisation is correct. Zotero is a clever program, but it does not know if any words within a book title should be capitalised, for example, the name of a country, a language, or a word following a colon. Here's an example that has all of these:

Haugen, E. (1953). The Norwegian language in America: A study in bilingual behavior. Bloomington: Indiana University Press.

As you can see, four words need to be capitalised: The, Norwegian, America, A. But when I imported this into Zotero from an online database, all of the words were capitalised. We need to fix this so that only the necessary words are capitalised. You can (a) go through and do it by hand, or (b) right-click on the book title in Zotero and select Transform Text | lowercase.
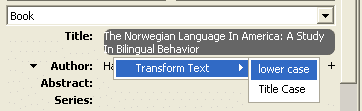
Now, all of the text will be in lowercase. Simply go through and capitalise the appropriate words manually. Easy.

When you cite Haugen's book in text, the full reference will appear in your reference list with the appropriate capitalisation. But, some people have complained in the Zotero forums that every word in the book title is capitalised in the reference list, even when they have manually corrected the capitalisation within Zotero.

Now, there might be more than one reason for this, but I have only come across one so far. When entering citations into a document, the reference will normally occur within parentheses at the end of a sentence.

For example, there are Norwegian bilinguals in America (Haugen, 1953).

This usage will not cause Zotero (and you) too many headaches. But sometimes, you will add some information within the parentheses because you have not gone into all of the details in your own writing.

For example, The number of Norwegian bilinguals in America is increasing (see Haugen, 1953).

The potential problem here is how you insert the word see, or any prefix for that matter. The wrong way to do this is to click Show Editor and to manually add the text.
The wrong way

Using the editor to insert the word see in this way may result in capitalised text in your book title in the reference list. Instead, what you should do is click on the Prefix field and type in the word see there.
The right way

If you want to type (see Haugen, 1953 for an excellent review), then you would enter see as the Prefix and for an excellent review as the Suffix. This will make sure that the book title in the reference list will be capitalised as you intended.

Easy, no?

Zotero: How to hide the journal issue number in an APA format reference list

I've been a big fan of Zotero for a long time. I'm currently using version 2.0b6.5, which is wonderful, and the Zotero forums are generally helpful, but there is one problem that I have come across now that I am finishing off the thesis: Zotero by default includes the issue number of a journal in the reference list. Now, I know what you're thinking. Who cares, right? Well, if you're thinking that then you are probably in the wrong place. Thesis examiners, journal reviewers and editors, conference reviewers all care. As an academic, having a properly formatted reference list is of paramount importance. A well-formatted reference list makes a good impression on your reviewer. An incorrectly formatted list... well you get the point.

Zotero is capable of formatting references in a variety of styles. One of the most popular is that of the American Psychological Association (APA), used in psychology and the humanities. According to the 5th edition of the APA Style Manual, "If, and only if, each issue of a journal begins on page 1, give the issue number in parentheses immediately after the volume number" (pp. 227). This means that 95% of the time, the issue number should not appear. So how do you get rid of it?

Well, Zotero has a .csl file for each of its styles, containing code that specifies what information should appear in the reference list and how it should be formatted. To make the issue numbers disappear, you simply remove the code that inserts the issue number into the reference list.

Finding the style file
The style files are located in the Zotero directory, C:\Documents and Settings\YourUserName\Application Data\YourBrowser\Browser\Profiles\xxxxxxxx.default\zotero\styles\. I have written YourUserName because yours will be different to mine, and YourBrowser because Zotero is compatible with any Firefox-based browser, so for most people this will be Firefox, but for others it will be Flock, and so on.

Removing the issue number
Open the apa.csl file and Find the issue number code and delete it (hint: it's right after the volume number code that you should leave untouched).

Update 18/07/2012: As tends to happen when new versions come out, the advice above will not work for newer versions of Zotero. You still open apa.csl with a text editor, but now find and delete the following text:

"text variable="issue" prefix="(" suffix=")"
on line 310.


Here's one we prepared earlier
To make this easy for those of you who aren't tech savvy, I have made my apa.csl file available for download (compatible with Zotero 3.0.8). Just copy it to your Styles folder and overwrite the existing file.

18 June 2009

Import high quality, high resolution images and figures (charts) into Word

A few weeks ago, Chris Davis gave an excellent MMM on producing high quality tables and figures. Most journals ask you to provide the figures and tables as separate files. They have professional page-layout people that take care of this stuff. However, students creating a PhD thesis (or a Masters thesis for that matter) have to tackle this problem on their own.

So what's the problem? Well, by default, Word downsamples (compresses) images that you paste into your documents. It does this to keep the filesize of your .doc file as small as possible. This is because once upon a time people used 1.44 MB floppy disks to transport their files. Amazingly, there are still people alive that want to compress their images in Word (more than the default).

Thankfully, there is way to insert beautiful, crisp images into Word. Click on the Tools menu, and select Options. Once the Options box appears, click the General tab and then the Web options button. In the Web options box, click the Pictures tab. Change the Pixels per inch value from the default (72) to 300 (or whatever your requirements are).

A word of warning: After having set this value, do not assume that it will stay there. This value resets to 72 dpi unpredictably and without warning. My advice is to check this setting before inserting an imporant image or figure. Don't worry about it changing without you knowing. If it reverts to 72 dpi, when you insert an image it will look awful, which should make alarm bells ring.

30 January 2009

Figures and captions in Word

Writing a thesis in Word is, let's say, challenging. As the document grows, Word tends to become less stable. This is particularly the case if you do a lot of chopping and changing. Sometimes, figures, graphs, and images move, or don't move when they should, or become separated from their captions, or disappear completely. This appears to be random behaviour and can be very frustrating. For this reason, I have put together this guide which will keep your figures and captions together and will help maintain what's left of your sanity.

Step 1: Insert the image
Before inserting your image, reveal all formatting characters (shortcut: Ctrl+Shift+8). Press Enter at the part of the page where you want to insert your figure, this creates a carriage return character, and then select Insert | Picture | From file. Select the picture and then click Format | Picture, and click on the Size tab to resize the picture as needed.

Step 2: Create the caption
Click on the picture once then select Insert | Reference | Caption. Name the figure and click OK.

Step 3: Group them
Select both the caption and picture, then right click and select Grouping | Group. Now right click on the newly grouped object and select Format | Object. Click the Layout tab, then the Advanced button, then the Text Wrapping tab and select Top and Bottom, click OK.

Step 4: Select and lock the anchor
Now click on and move the anchor to the carriage return you created earlier.Get back into Format Object | Layout | Advanced, and click Lock anchor and set Horizontal Allignment to Centered relative to margin, Vertical Absolute position set to 0 below paragraph, tick Move object with text and Layout in table cell. Click OK.

Step 5: Format the caption
Click on the caption and format the text according to your figure caption styles. For APA, you will need two: one for the Figure x. part (in italics) and another for the title of the figure (not in italics).

Now you can make edits, add or remove paragraphs and your figures and captions will not disappear when you break over a page. Easy, no?

14 August 2008

Fix uneven line spacing when using Doulos SIL for transcription

If you have ever transcribed speech using font such as Doulos SIL, you know how frustrating it can be when the line spacing changes in your document. You have a line of text that stands out and looks strange.

Doulos SIL includes characters with diacritics that require a looser line spacing than fonts such as Times New Roman. If the line spacing was like that in Times New Roman, many characters would be clipped.

However, there is a solution! The SIL fonts FAQ provides the answer.

By adjusting the line spacing in the word processor, such as Microsoft Word 2003, it is possible to assign the same line spacing value to all lines of text within a given style. In Word, select Format|Paragraph and set the line spacing to use the Exactly setting and specify a value more suited to your needs.

12 August 2008

Creating a thesis in Word: Formatting text

Most people use Word as if it is a typewriter. It's not. It's a word processor. Chances are that you use it as if it is a type writer too. It's ok. It's not your fault. No one teaches us how to use a word processor properly. Well, lets get started.

Using Styles and Formatting
A style is collection of numerous formatting options that are grouped together, given a name, and that may be applied to selections of text throughout your document. When we create a document, the formatting we use indicates different levels within our document. For example, headings may be size 14, bold, underlined and centred; subheadings may be size 12, bold and left aligned; and, body text may be size 12 and justified.

The Styles and Formatting pane is accessed by pressing this button on your toolbar or from the Format menu (keyboard shortcut: Alt+O+S). In addition to the default styles, you can create your own styles. Here is a screenshot of what my Subheading style might look like:Notice that I have selected size 12, bold and left alignment. More detailed formatting options can be specified by clicking the Format button in the bottom left corner (it's a shortcut to the Format menu including Font, Paragraph, Bullets and Numbering etc.). Clicking the Add to template checkbox will ensure that this style will appear in all new Word documents in the future (an easy to way to ensure consistency in the formatting of your documents).

Applying styles to text
The Styles and Formatting pane contains the existing styles available for your document. To apply a style, simply select the text in the document and click on the style in the task pane. The selected text on your document will change to reflect the formatting options of that style. You may repeatedly change the style applied to a selection of text by clicking on different style names. You can also make changes to a style after it has been applied to sections of text, and all of the sections of your document that have that style will update automatically. This allows you to change the formatting of large sections of your document quickly. For example, if I change the Subheading style above by clicking on the italicised text button, then all of text that I have applied the Subheading style to (presumably all of my subheadings) will automatically become italicised.

Never press Enter Enter to put a blank line between two paragraphs
We are all guilty of this. It might be ok to press the Enter key twice if you are just creating a page that you want to quickly print out, however, this is not the way that you should separate paragraphs in your serious documents - especially your thesis. At the end of each paragraph, you should press the Enter key only once. To create a space between one paragraph and the next click on Paragraph in the Format menu. Increase the value of Spacing After so that it is greater than 0 point. In this case, there will be a 12 point space after my paragraph - when I press the Enter key. Of course, you can specify this as part of any style. Had I specified this for my Subheading style above, this would mean that all pieces of text that I apply the Subheading style to would also be followed by a 12 point space.

Stop getting frustrated at the one line of text that won't fit on the page
Word 2003 allows you to prevent individual lines from creeping over the page. In the Paragraph dialog (shown above), click on the Line and Page Breaks tab. Enabling Window/Orphan control prevents Word from printing the last line of a paragraph by itself at the top of a page (called window), or the first line of a paragraph by itself at the bottom of a page (called orphan).

Word also allows you to keep two paragraphs together on the same page. Use Keep With Next to keep one paragraph on the same page as the next paragraph.